Home / Software & Firmware

Software & Firmware

MediaStar Pro Software

MediaStar Pro Software

Our included MediaStar Pro software for Windows gives users unlimited control over all media and technical aspects within a show and completely integrates with our additional EzDMX hardware and software for complete DMX lighting control. Utilizing the MediaStar Pro hardware with our MediaStar Pro software, you will have a reliable and trusted system used by the biggest shows and professionals in the entertainment industry.

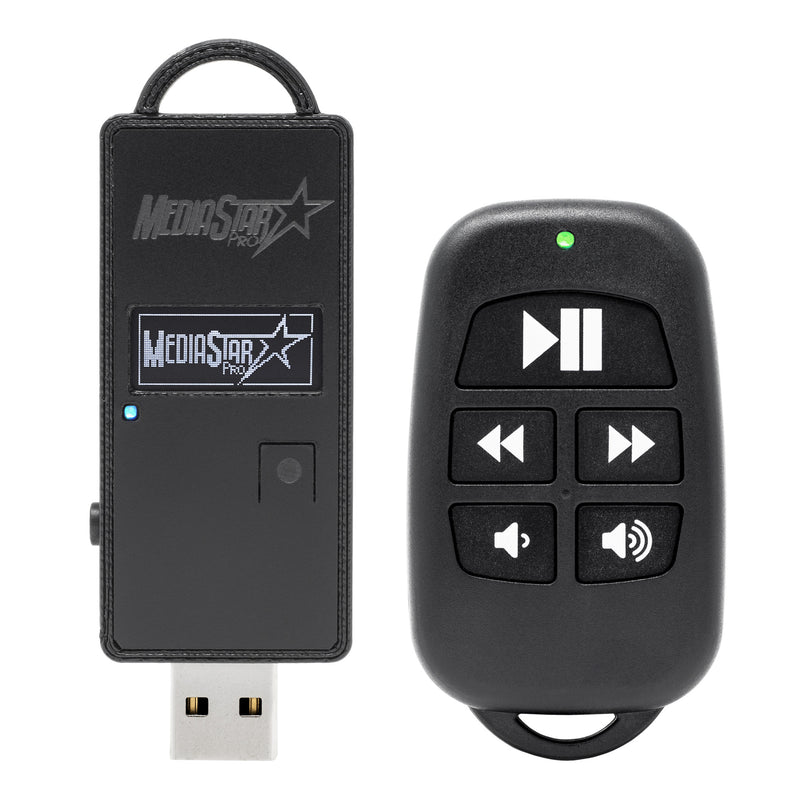
The MediaStar Pro Smart-Link remote can control 15 total functions with the software including hands-free operation and settings are completely user-configurable.

Remote functions include:

  • Play/Pause/Un-Pause
  • Fade/Auto Fade/Fade To Pause
  • Previous/Next track
  • Volume Up/Down Control
  • Volume High/Low Instant Recall
  • Playlist Reset
  • Instant Track #1 With Position Recall
  • Built-In Reed Switch For Hands-Free Control

Advanced track options provide the ability to:

  • Auto-Start/Auto-Pause
  • Play/Pause/Unpause/Hard Pause
  • Adjust Track Volume Multiple Times Within A Song
  • Insert Videos & Playback Loops
  • Live Camera Feed With Fade In/Out
  • Ability To Insert DMX Lighting & Effects Queues Using EzDMX
  • JPG Images
  • Waveform Generator To Visually See Your Song While Programming
  • Optional External Wireless Transceiver
  • Pop-Up Screen Notes For Visual Cues

Software features no longer supported:

  • PowerPoint Presenter has been removed
  • ShowXpress Scenes has been removed
  • Transmit to LCD display has been removed
  • Custom Software 1 & 2 has been removed

Tip: If you need to switch between applications once the MediaStar Pro software is full screen in the live show view you can easily press ALT-TAB. This will toggle between any open applications and bring them to the front of the screen.


MediaStar Pro (Windows Software Update)

MediaStar Pro software is a free downloadable program that currently works on computers operating Windows 7 through Windows 10. If you are using an Apple computer, you will need to run Bootcamp or download the Fusion app and install a compatible version of Windows onto the MacOS.

The following software is an update to the original MediaStar software for Windows, this is not a Firmware update. Please follow the below instructions to update your software to the latest version which is now called MediaStar Pro.

HOW TO INSTALL:

The updated MediaStar Pro software now seamlessly works with upgraded controls using the new MediaStar Pro hardware. You will need to download 2 files. The first is FFDSHOW which is the codecs to play various video file types. The second is the MediaStar Pro software which includes hardware drivers. 

Tip: You can also use your original MediaStar USB transceiver which allows the continued use of any original hardware such as wireless servos and wireless relays.

This updated software only works with Windows 7 through Windows 10.

When you install the new application it will be called MediaStar Pro and will not overwrite any existing files. You can use your original MediaStar files and settings located in your Documents folder by simply renaming the “MediaStar” folder to “MediaStar Pro” and make sure to put a space between MediaStar and Pro. Once you open the updated program you may get a notice it can’t find your last playlist. Select OK and open any saved playlist. You are now good to go with your files! You then should go into Settings and click remote settings to select how you would like your new remote hardware to function. You will notice there many more options than the original hardware remote. That’s it!!

We are currently working on additional updates and improvements with the software for even greater control. The best part… this software is totally included!

When you plug your new MediaStar Pro Dongle into your computer the first time, set the dongle to USB Mode and select MediaStarPro as your profile. 


1) Download (Windows) FFDSHOW:

Version: 1.3.4533

Choose the version based on your computer. Follow the steps below to see if your computer is running a 32-bit or a 64-bit version of Windows.

Windows 10 & Windows 8.1

1. Select the Start button, then select Settings> System> About.
2. At the right, under Device specifications, see System type.

    Windows 7

    1. Select the Start button, right-click Computer, and then select Properties.
    2. Under System, see the system type.

      If you play .mpg video files make sure during installation under Select Additional Tasks you check to include MPEG-1 & MPEG-2 (see below image).

      DOWNLOAD FFDSHOW 32BIT 

      DOWNLOAD FFDSHOW 64BIT 


      2) Download the latest (Windows) MediaStar Pro Software:

      NEW Version: 3.0.0

      DOWNLOAD MEDIASTAR PRO 


      Possible Security Restrictions

      If your Windows computer prompts you with security settings, allow the install of this program and follow your Windows computer instructions to do so.


      PC Optimization Guide for Windows (OPTIONAL)

      The following optimizations for Windows are suggested for a better experience using MediaStar Pro software on your PC. These settings are recommendations and may differ from your computer.

      Note that many of the settings below require that you access the Windows Control Panel. If you do not know how to do that, follow these steps:

      1. From the Start screen, move your mouse to the top-right corner of the screen and hold it there. You will see charms appear along the right edge of the screen.
      2. Click on the magnifying glass to open the Search, then type in Control Panel.
      3. You should see the Control Panel show up in the results. Press Enter to open it.
      4. Click the box next to View By and select Large Icons. This will give you a good view of working within the Control Panel.

        Need further assistance finding the Control Panel, check out this info from Microsoft, Control Panel.

        Update Graphics Driver

        Outdated graphics drivers often times will not use the GPU efficiently. This can put a strain on your system’s processor, which in turn steals resources from MediaStar Pro. As a result, you may notice a decrease in performance from MediaStar Pro. A simple solution to this is to make sure you keep your graphics drivers updated.

        To find the make and model of your graphics controller and update it, follow these steps:

        1. Open the Control Panel
        2. Click on Device Manager
        3. Click the triangle next to Display Adapters
        4. Your graphics card model will appear directly below
        5. Double-click to view its properties
        6. In the General tab, you can find the model and the manufacturer. In the Driver tab, you can find the driver version and the date with a possible update button.
        7. Go to your manufacturer’s website to find the latest driver for your graphics controller.

          Disable C-State Transition and Turbo Boost (BIOS)

          Note that not all computers have these settings. If yours does, it is recommended that you disable them if possible. These two settings can cause the processor to change speeds depending on the computer’s activity. This can cause errors or slow performance with MediaStar Pro.

          You should consult the manufacturer of your computer or your motherboard to see if these settings are available and learn how to disable them.

          Adjust Power Options

          It is recommended to adjust the power options so that your computer does not enter sleep mode, put the hard disks to sleep, or suspend USB devices. These features can cause issues.

          Follow these steps to optimize your power options:

          1. Open Control Panel
          2. Click on Power Options
          3. Select High Performance
          4. Click on Change plan setting
          5. Set the display’s sleep time as well as the computer’s sleep time to Never
          6. Click on Change advanced power settings
          7. Click the + next to Hard Disk, then click the + next to Turn Off Hard Disk After
          8. In the text field, type Never
          9. Click on the + next to USB settings, then click the + next to USB selective suspend settings
          10. Double-click where it says Enabled, then click Disabled
          11. Click on the + next to Processor power management, then click the + next to Minimum processor state
          12. Type 100 in the text field (%)
          13. Click Apply, then OK
          14. Click Save Changes

            Disable USB Power Management

            By disabling the USB power management, you can free up bandwidth on the USB bus which will help with issues related to your device recognition. To turn it off, follow the steps below:

            1. Open Control Panel
            2. Click on Device Manager
            3. Double-click on Universal Serial Bus Controllers
            4. Double-click on the first USB Root Hub item
            5. Click on the Power Management Tab
            6. Uncheck the box that says “Allow the computer to turn off this device to save power” and click OK
            7. Do this for all USB Root Hub, Generic USB Hub items, and your USB Mass Storage Device (which is your MediaStar Pro dongle when plugged in)

              Hard Disk Optimizations

              These optimizations will improve disk performance when playing back files.

              1. Do to your Documents folder
              2. Right-click on the folder MediaStar Pro which is where you store your audio and video files, then choose Properties
              3. Click Advanced
              4. Make sure “Compress this drive to save disk space” is unchecked
              5. Click Apply, then OK
              6. Repeat this for any drive or folder where you store your audio and video files for your show (it's best to keep everything in the MediaStar Pro folder)

                Disabling Screen Saver

                Your screen saver may cause issues if it starts while MediaStar Pro is running. To turn it off, follow these steps:

                1. From the Start Screen, select the Desktop tile
                2. Right-click on your Desktop and select Personalize
                3. Click on Screen Saver
                4. Select None, then click OK

                  Disable User Account Control

                  User Account Control can cause issues with volume read/write permissions. To turn it off, follow these steps:

                  1. Open Control Panel
                  2. Click User Accounts
                  3. Click Change User Account Control Settings
                  4. Set to Never Notify
                  5. Click OK
                  6. Restart your computer

                    Misc. Optimizations

                    The following is a list of recommendations to get better performance out of your system.

                  1. Avoid connecting audio interfaces or controllers to USB or Firewire hubs where possible. You will experience an overall better experience when you plug directly into your computer.
                  2. Make sure all unnecessary programs are closed. They can tie up useful resources.
                  3. Turn off any software utilities that run in the background, such as Windows Messenger, calendars, anti-virus, firewalls and disk maintenance programs.
                  4. Disconnect any unused USB devices from your computer.

                  5. Original Instructional Videos 

                    PLEASE NOTE, These videos demonstrate the overall use of the original software. The new features are not yet covered as we have just released version 3.0.0. Those videos will be posted soon.

                    MediaStar Initial Setup (1 of 5)

                    MediaStar Library (2 of 5)

                    MediaStar Advanced Track Settings (3 of 5)

                    MediaStar Playlist Management (4 of 5)

                    MediaStar Playlist Playback (5 of 5)


                    ERRORS

                    If you encounter an error during playback related to a media file (for example a .mp3) you may have a bad file or bad metadata for that file. Either remove the metadata (do a google search for "How To Remove Metadata From MP3 Files" as there are several ways to remove) or use a program like Sountaxi.info. If you are still having issues with a file you will need to replace the file.

                    To avoid errors and ensure your files are good, always test your show from start to finish before performing when you add any new music, pictures, or videos and make sure you play back each media file from beginning to end.

                        EzDMX Lighting Software

                        EzDMX Lighting Software

                        EzDMX software for Windows uses our proprietary hardware cable and gives any performer complete control over theatrical lighting, moving lights, dimmers, par cans, special effects, and much more. The software is user-friendly so you will be up and running in a matter of minutes.

                        The software is a free downloadable program that currently works on computers operating Windows 7 through Windows 10. If you are using an Apple computer, you will need to run Bootcamp or download the Fusion app and install a compatible version of Windows onto the MacOS.

                        EzDMX is free to download but you will need our proprietary EzDMX hardware cable to activate it and use with your DMX lighting fixtures.

                        The cable is a USB-A to DMX-Male. Please note generic cables will not activate the software. Once you have downloaded the software and plug in the EzDMX cable you will notice the LED light rapidly blinking on the USB side of the cable. This is to let you know the connection has been made and the DMX signal is being sent out of the cable.

                        Scenes are very easy to create with features allowing you to rapidly control multiple channels at once. Editing is painless with a clear visual representation of the scene as a whole through a timeline. Each scene can perform a fade for a smooth transition instead of an immediate blackout. Enable macros with one simple button or integrate your entire show through our MediaStar Pro software for complete live show control.

                        EzDMX has been integrated and designed to work in tandem with our MediaStar Pro software and has the ability to control one universe of DMX (512 channels), up to 384 macros, and an unlimited number of scenes and venues.

                        • Controls our proprietary DMX hardware cable
                        • Very user-friendly, no steep learning curve 
                        • One universe of DMX (512 Channels)
                        • Up to 384 macros per venue
                        • Unlimited scenes
                        • Unlimited venues

                        This software only works with Windows 7 through Windows 10.

                        PLEASE NOTE: WE HAVE LIMITED SUPPORT ON THIS FREE SOFTWARE.


                        Download the latest (Windows) EzDMX Software Version: 1.1.1.0

                        DOWNLOAD EzDMX


                        Possible Security Restrictions

                        If your Windows computer prompts you with security settings, allow the install of this program and follow your Windows computer instructions to do so.


                        Instructional Videos

                        EzDMX Intro to DMX (1 of 4)

                        EzDMX Fixtures (2 of 4)

                        EzDMX Scenes (3 of 4)

                        EzDMX Macros and Overall Use (4 of 4)

                        Dongle/Remote Firmware

                        Dongle/Remote Firmware

                        The following instructions will guide you on how to update the firmware on your Dongle and all Smart-Link Remotes.

                        Make sure to update all devices consecutively with the same firmware.

                        PLEASE NOTE:

                        • IF YOU ARE UNABLE TO UPDATE YOUR DONGLE TRY A DIFFERENT USB PORT AS SOME PORTS MAY HAVE A POOR CONNECTION.
                        • IF YOU ARE UNABLE TO UPDATE YOUR REMOTE TRY A DIFFERENT CABLE AS SOME CABLES ARE ONLY USED FOR POWER AND DO NOT TRANSFER DATA CORRECTLY. ALWAYS USE QUALITY CABLES AND ADAPTERS.
                        • SOME APPLE COMPUTERS ARE NOT WORKING WITH JAVA CORRECTLY. IF YOU GET TO (STEP 3) AND YOU CAN’T DETECT YOUR DONGLE YOU MAY HAVE THIS JAVA ISSUE. WE DO HAVE A WORKAROUND TO UPDATE MANUALLY USING TERMINAL WHICH IS LISTED AT THE BOTTOM OF THIS PAGE.


                        STEP 1

                        Download the latest combined dongle and smart-link remote firmware.

                        Firmware Version: 20110913

                        DOWNLOAD FIRMWARE

                        • PLEASE NOTE: THE REMOTE BATTERY LEVEL INDICATION ON YOUR DONGLE HAS BEEN TEMPORARILY REMOVED. YOUR BATTERY IS A (3V) CR2032 AND HAS A 2 YEAR STANDBY, WITH 10,000 BUTTON PRESSES.

                        STEP 2

                        Visit java.com and download the latest free Java and then install it. 


                        STEP 3

                        Once Java is installed, press and hold the button on dongle while you plug into the computer. The dongle screen should say Bootloader (example A).

                        On your computer open our latest firmware file you downloaded from step 1. Once open, click Identify and Update. (The RED LED will flash rapidly) DO NOT UNPLUG UNTIL LED LIGHT STOPS FLASHING (example B). Please note your firmware version should match the version number you downloaded from step 1. If nothing happens on your computer screen above identify and update you may have a Java issue. Scroll to the bottom of this page and follow *** Java Terminal Workaround ***.

                        Follow the dongle screen prompt as your dongle will revert back to default settings (example C). Press button on dongle.

                        Once your screen has reset your firmware has been updated (example D). Your dongle settings have reverted back to factory default with the new firmware. You can now unplug your dongle, leave java updater open, and proceed to step 4.


                        STEP 4

                        Open your remote case on the side with a notch using a coin. Carefully remove the electronic board and remove the battery. Use a USB to Micro-USB cable and plug the cable into your computer, leave the Micro-USB cable unplugged from remote (example E).

                        Press and hold the top button on the remote (Play/Pause button) and then plug in the Micro-USB cable. The LED will light RED and you can let go of the button (example F). Click update on the computer.

                        A few seconds later the RED LED will turn off and your remote has been updated (example G). You can unplug and repeat with any extra remotes. Reinsert the battery and carefully place the electronic board back in the case. Snap the case back together and test your equipment. You can now close the java updater and adjust your dongle settings back to your preferred choices using the remote.


                        Possible Security Restrictions

                        If your Windows computer prompts you with security settings, allow the install of this program and follow your windows computer instructions to do so. If you are running an Apple computer you may see the following security message.. click OK. Then go to your System Preferences (Top Left Apple, System Pref..) and click Security & Privacy. Then on the bottom right click Open Anyway and follow any remaining instructions.


                        *** Java Terminal Workaround ***

                        The below instructions are only if you can not update your dongle or remote using the above Step 3. Please note be VERY CAREFUL using Terminal and do not type in anything other than what's listed. Once your firmware has been updated you can close Terminal.

                        1. Move your downloaded firmware file (mspload.jar) to your desktop.
                        2. Press command & spacebar (at the same time) to open Spotlight Search.
                        3. Type in: Terminal (and hit enter) to open Terminal.
                        4. Type in: cd desktop (and hit enter).
                        5. Type in: java -jar mspload.jar (and hit enter) to open the firmware uploader. (You may need to install JDK if asked and then start step 3 again.)
                        6. Go back up to the original Step 3 (example A) and follow the instructions.


                        RELEASE NOTES:

                        11/09/2020 - Version: 20110913

                        • Fixed issue using two remotes back and forth

                        05/29/2020 - Version: 20052815

                        • Added profiles for Go Button (A & B) and updated Qlab profile
                        • Added profile for Ultimate Control
                        • Removed battery indication temporarily on dongle screen
                        • SDCard mode now blinks LED when cued at beginning of track 1
                        • Minor improvements and updates
                        • KeyMap # Profile (Play 1, 2 Long) (RR 3, 4 Long) (FF 5, 6 Long) (Vol- 7, 8 Long) (Vol+ 9, 0 Long)